Showing posts with label HowTo. Show all posts

Wednesday, October 14, 2015

Terrain from spare parts: Building a dead tree

Today I want to continue with my articles about how you can make terrain out of chunk or spare parts. This time I will show you, how you can make a dead tree (the one you can see on the left side) completely from chunk.

What you will need for this:
- Paper towel
- A twig or dried flower stem
- Something for a base (e.g. a washer)
- Glue
- Sand/Earth
- Static grass/flock (completely optional)

Twigs
Paper towel

Saturday, February 22, 2014

Color theory - 3 Colors Up

Long time no see... But today I will present you at least something hobby related. I put together a playlist from a very good video tutorial series related to color theory. Romain from Beasts of War explains all important parts, be it contrast, complementary colors, color triads and so on.


Complementing this I showed you the Color Scheme Designer some time ago.
So grab your color wheel and start experimenting ;)


So long,
Paradox0n

Saturday, December 21, 2013

How to Play/BatRep - Flames of War on BoW

Normally I am not into historical wargaming. My time when I played with tanks and build those fantastic Revell kits is looong ago. I even had some trenches and bunkers then.

But yesterday the second part of a introduction of Flames of War was uploaded from Beasts of War and I really enjoyed this one. Therefore I put the parts together in a playlist and want to share them with you. As soon as they put up part III I will add it to the playlist.

So watch Warren & Dave play a game of Flames of War:


Important note: These videos completely belong to Beasts of War. I just share them for easy access and enjoyment.


So long,
Paradox0n

Sunday, November 10, 2013

Hobby Basics - Cleaning your stuff

Today I had a very frustrating moment (to be honest moments): Since the wheather here is REALLY bad I loaded my wet palette, got my miniatures I wanted to paint and switched some nice music on. Then I wanted to do the first brush strokes and BÄMM! One brush stuck together nearly to the point and the other brush divided itself into two nice halves... And worse to that, my airbrush completely stopped working and I had to disassemble it completely. And oh boy... it was nearly completely glued together (although I cleaned it after every usage like I described earlier). After calmly counting to 10 and taking some deep breathes I gritted my teeth and set to the task of cleaning my stuff. The brushes are my everyday brushes and its not really a loss if I can't rescue them but with the airbrush it is somehting completely different.

Lesson learned Number 1:  Keep your brushes in safety from your cats. Seems they found a new toy to play with on my desk and made things even worse...
Lesson learned Number 2: The Vallejo Primer I reviewed some time ago is a bit more sticky than normal paint and a normal blow out and cleaning isn't enough.

To see the positive in this disaster I thought on doing another Hobby Basic post on cleaning your stuff the advanced way :)

Saturday, May 4, 2013

Hobby tips - Cleaning your airbrush

My Airbrush, a Fengda FL-C 12209
As some tutorials in the web I read tried to tell me told how difficult the cleaning process of my airbrush should be and how it really isn't I thought a short article to sum up my experiences would be the best.

First of all: Cleaning your airbrush is neither complicated nor will it cost you much time. On the opposite! It should be part of your painting routine because it really makes the painting process much more comfortable.
If you ever opened your mouse to clean it.. Tadaaaa you can clean your airbrush too.

Saturday, April 13, 2013

Netfindings - NMM Gold Tutorial

Another lucky finding on the web: Rodion Rubin made a short but pictured tutorial of: How to paint NMM gold. Since I am a rather bad painter I always stand in awe in front of paint jobs like these.
Last picture of the NMM painting tutorial from Rodion Rubin
Last picture of the tutorial
Hope this is useful for you.

Cya,
Paradox0n

P.S.: If you aren't interested in news/stuff like this, please say so ;)

Saturday, December 1, 2012

HowTo: A simple industrial base

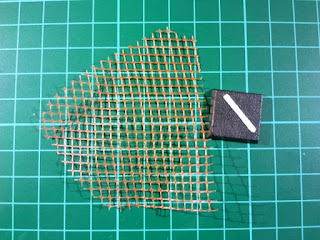
While sitting around and experimenting with stuff, I got the idea to make a simple industrial base for games like Necromunda, Eden etc. As usual I tried to do this with stuff lying around and had in mind to do a tutorial if the result is somewhat OK.
As you read this, I must have thought it worthy to write about :)

Putting some mesh on your base

Using plastic net as mesh
Some plastic net and a base
To be honest, this was the most tricky part of this experiment. At first I tried to cover the base in superglue and then just press the plastic net onto it. But since I have the "gel type" of superglue I think this didn't work out. Therefore I just used superthinned wooden glue to pin the net down and waited for it to dry completely

Tuesday, October 9, 2012

Wheathering tutorials from Mike Chambers

Some time ago I stumpled upon some really great tutorials on how to stain/wheather wood. Just have a look at Rusty Stumps Scale Models, especially the ones from Mike Chambers are really good.

He uses multiple inks to stain real wood and use it for terrain and buildings. Especially the small series about this technique is really good. If you want to risk a look, here are the direct links to the PDFs from the page:
If you like them, just take a look at the other articles on they page, they have some really nice tips there.


So long,
Paradox0n


P.S.: A small comment if I should be continue with stuff like this would be appreciated. Don't want to bore you to death with stuff you all already know :)

Saturday, August 11, 2012

HowTo: Building a tower - Part 4

The roof, the roof, the roof is on fire. I thought a while about the roof I want to build for my tower: Just a flat one with battlements or a pointy one with roofy shingles? Since I already invested so much time I decided to make the pointy one. So start the video and read the rest of this article :)


Sunday, July 15, 2012

HowTo: Building a tower - Part 3

After building and painting the core for my tower, it is time to build the upper level of it. Somewhere the guards or other inhabitants must live.

First I built a core of styrofoam which diamater was a little bigger than the stone structure. Then I glued everything on the top of my stoneworks and let everything really dry. Meanwhile I sorted and cut my wooden "swizzle sticks" into the same length. You need more than you think, I had to borough some of my friend. Lucky enough you get them for free in every fast food restaurant. I used some clippers. The edges don't need to be plain and exact.

Cutting everything to length

Monday, July 9, 2012

HowTo: Modular Gaming Table - Part 4

Ok, we already went through a lot of steps. First we prepared the six basic modules and shaped some with hills and then we started coating everything with our structure paint. Now it's time to adding detail to the whole thing. This part is again not really magical, but you should take care in this process. The most importan thing is that every module must be completely (!!!) dry. We had a kind of "oven" on my balcony on which the modules could dry for a complete summer day.

Dried modules
Drying station for our modules

Thursday, June 28, 2012

HowTo: Modular Gaming Table - Part 3

It's terrain thursday (nah just kidding, atm I am in the mood to do so) so I will post another part of my modular gaming table series. After preparing the six basic modules and shaping some with hills it is time to get dirty and put some paint onto our modules. Therefore we mix our own structure paint (the paste/paints you can buy are WAY too expensive). Besides a big bucket (~5l bucket is big enough) we need:

Bucket of PVA/white glue:

Approx. cost:  ~ 8 Euro

Bag of bird grit:

Approx. cost: ~ 90ct

Bottle of brown paint:

Approx. cost: ~ 5 Euro

Pour everything together, in the end we used a mixing ratio of about 1:1:1:1 (water, paint, sand, glue). Just try it out what suits you best. The structure paint should not be too runny and should not be as thick as toothpaste. You should be able to spread it out easily without the paint beeing transparent or only gluing sand...

Applying the structure paint 

Tuesday, June 19, 2012

HowTo: Building a tower - Part 2

Ok, after showing you how I build the foundation for my tower, now it's time to paint the stone carvings. This will be only a short part, because I think I can't show you some wicked magic here, it's just good old handywork.

After the core was build together I primed everything black. At this stage I didn't have my airbrush yet so I was forced to do everything by hand.I used some cheap black color from the hardware store to cut down the expenses. After three layers everything was completely black. The three coates of paint had one side effect I noticed when everything was dry: The carving was much more stable than before.

Primed everything black

Tuesday, June 12, 2012

HowTo: Modular Gaming Table - Part 2

In the last part of this HowTo series, I explained how I build the base for the gaming modules. In this part I will describe how the hills were made and how I prepared the board to get the first layer of the structure paint.

I suggest you listen to this song while reading the next part:


Wednesday, June 6, 2012

HowTo: Building a tower - Part 1

Again I'm keeping one of my promises, I start the second planned series of my HowTo's. Today I will talk about building a  tower from scratch.
As you have seen in my other HowTo's I like building terrain pieces from spare parts or even garbage. But in this case all my thoughts about how I could achieve a decent result failed. Therefore I started planning a complete building from scratch. Thanks to some research and one REALLY good tutorial from Gidian Gelände, the concept grew fast. So I collected the needed material and started to experiment with things I had never done before (again).

Chips and Selitron

Saturday, June 2, 2012

HowTo: Modular Gaming Table - Part 1

As promised I will do a HowTo-series about how I build my gaming table. The gaming table was build last year, toghether with a close friend of mine and has seen now three battles (one you can in my first battle report). We had enough of playing on a normal dining table. The Citadel board was too expensive for us (since we only play on an irregular base) so we researched a bit and planned our own modular board.
Modular because:
  • we wanted a table which looked different when we wanted to
  • I have not enough room to store one or three big plates
  • and we wanted to save some money :)
So we made a masterplan and went shopping in the local hardware store. After the first tour we replanned everything because we didn't want to spent as much money for material as we would have to pay for the Citadel board... Therefore I will do a Step by Step how the boaard was really build and will give an overview how much the material had roughly cost.

Tuesday, May 29, 2012

Terrain out of junk - Impassable terrain

Again an article about something I made up to create terrain out of junk. We had our fruit basket full of exotic fruit and to our misfortune some of the passion fruits were really dried up and not ready to eat anymore. They were so hard, I think I would be able to throw in a window with them... But no, building terrain with them is much more fun. They have a real alien look so you could use them as tyranid spores or as some warped stones from the chaos desert or dragon eggs or something like this. Decide yourself ;)
 
Impassable Terrain
Dragon Eggs? Warpstone? Tyranid Spores?

Sunday, May 20, 2012

HowTo: Photobucket

Everytime I made some photos I cursed because without the right equipment the pictures often get somewhat blurry, oversatureated or shiny. Therefore I searched for an easy way to build me place where I can make my pictures. Prices for professional equipment ranges from 40€ to open end and I didn't want to spent my money on something like this (the money saved could be invested in paints/miniatures or a nice evening with my wife). The best solution for low budget I found (in different places) seems to be the photobucket:

Photo bucket at no cost

Friday, April 27, 2012

Terrain from spare parts - Part 2: Stack of wood

Seems terrain from spare parts really gets a series on my blog. Part 2 contains another terrain piece made completly out of stuff I had on my workingtable and from junk I would have thrown away otherwise . Its nothing fancy or even big, but it fits nicely to my growing village ;) A small stack of wood:

Stack of wood

Tuesday, April 17, 2012

Terrain made of aquarium decoration

Because we have two cats, we are pretty often in pet shops in our area. And since I re-started with the wargaming hobby, I always looked out for stuff to build cheap and easy terrain pieces with. Not long ago I found some big trees in the fish department and I took a closer look and instantly bought the piece.
I don't remeber the manufacturer or the store where I bought it, but it was around 4-5€ and is really tall (measures 10 cm in width and 11cm in height).

I just glued it on an old CD, sanded the base, drybrushed everything and gave a quick painting shot for the glowing warpstone. Et voilà, a warped tree is finished:

Shot to see the warpstone
Shot to see the broken bark
and the glowing warpstone

Related Posts