Showing posts with label Tutorial. Show all posts

Wednesday, October 14, 2015

Terrain from spare parts: Building a dead tree

Today I want to continue with my articles about how you can make terrain out of chunk or spare parts. This time I will show you, how you can make a dead tree (the one you can see on the left side) completely from chunk.

What you will need for this:
- Paper towel
- A twig or dried flower stem
- Something for a base (e.g. a washer)
- Glue
- Sand/Earth
- Static grass/flock (completely optional)

Twigs
Paper towel

Sunday, November 2, 2014

Painting Buddha Academy: Aanchuth series

This time Matt and Mati paint Aanchuth the Cursed from Mierce Miniatures. The series shows you among other things how to paint fur, skin, horns and wood.

As usual I just bundled the free videos together in one playlist. The videos are produced and owned by the Bruddahs from Painting Buddha. All kudos go to them.


If you like the videos, please subscribe to their Youtube-Channel and have a look at their shlog/website.

Hope you enjoy it.


So long,
Paradox0n

Some unrelated Post Scriptum after the jump:

Friday, October 3, 2014

Painting Buddha Academy: Horus series is finished

The next video series form the PBCC is finished. This time not only Ben works at the Miniature but also Matt jumps in with painting the base. If you don't know what the PBCC is, please check out Painting Buddha.

As the last time I bundled all the videos from the Horus series together in one playlist. Part 5 (painting the wolf) and Part 7 (painting green marble) are missing because they are only accessible for subscribers, so if you are interested in those or a 1080 version you must opt for a subscription :)


If you like the videos, please subscribe to their Youtube-Channel and have a look at their shlog/website.

But this week there is even more insanity from the guys. Up until now, you got some step-by-step introductions in a PDF if you opted in for one of their subscritpion models. But since Michael is absolutely nuts and hast lost his mind in the plans to conquer the galaxy (just kidding) they know make the PDF availably for everybody and even give out a voucher for those who already bought it.

Hope you enjoy it.


So long,
Paradox0n

Thursday, September 4, 2014

Painting Buddha Academy: PBCC released the first video in their series

As you all know by now I am a pretty big fan of Painting Buddha and their DVDs. And they don't stop surprising me! Michael, Ben and Mati did another masterstroke: They opened up their own painting academy and just promote it.

If you want to know more about the Painting Academy, the features, costs and everything, please read their very informative and comprehensive blogpost concerning the Painting Buddha Community College.

 And what better way to promote that with the first tutorial video (out of 42 as usual)!


I put the released videos all together in one playlist for your convenience and hope Michael is OK with that. You can find the original blogpost from Painting Buddha on their new website/shop/blog and all the videos on their Youtube Channel.

I myself only opted to take the blue pill and hope they continue to produce DVDs and stuff (which I will most likely buy then) and not switch completely to this community thing. To not take a membership (for now) is just a personal preference, most paid communities I had a look on didn't just convince me. Have to see how the PBCC will be in the future.

Hope you enjoy it.


So long,
Paradox0n

P.S.: I think Michael really wants to take over rulership and be "El Presidente" ;)

Tuesday, July 8, 2014

Painting Tutorial from Biohazard Painting: Dust Axis Light Walker "Hans"

Dust Axis Light Walker "Hans" from Biohazard Painting
If you are interested in Dust maybe I have found an interesting painting tutorial for you:
Biohazard Painting posted a nice tutorial for the Axis Light Walker "Hans" on his blog. The picture on the left shows the finished model and is directly taken from the article.

He also has some other tutorials on his page (at the moment mainly for Sedition Wars) so maybe you can have a look there too.


So long,
Paradox0n

Wednesday, July 2, 2014

Painting a Fire elemental with Ben Komets from Painting Buddha

I am still alive and digging through videos and sometimes even blogposts. But my private projects (planing a hiking tour in Norway and the needed training) or my aquarium (which made some troubles lately) keep me away from painting and even blogging.
But today I stumbled upon a very nice (and free) painting video from our brudahs at Painting Buddha where Ben Komets paints a tabletop quality version of a Drakerys Fire Elemental. So sit back, watch and enjoy:


And as much as I hate advertisement mails, the one from Michael got me rolling and I will surely save me an Early Beard (so funny!) for the season 1.2/1.3 DVD bundle. I loved the first DVD set they did and want to support the work the guys at Painting Buddha do.


So long,
Paradox0n

Saturday, February 22, 2014

Color theory - 3 Colors Up

Long time no see... But today I will present you at least something hobby related. I put together a playlist from a very good video tutorial series related to color theory. Romain from Beasts of War explains all important parts, be it contrast, complementary colors, color triads and so on.


Complementing this I showed you the Color Scheme Designer some time ago.
So grab your color wheel and start experimenting ;)


So long,
Paradox0n

Friday, November 29, 2013

FFotW - Creating Neon Signs

It is time for another Friday Finding of the Week: Rob Hawkins shows on his blog how he created neon signs for the Wild West Exodus terrain he did.
Very good step by step tutorial he did there and a great effect you can achieve with it. If you don't know this one already have a look I can really recommend it.

And if you are there you can also just have a look at the other terrain tutorials or the loads of stuff he has on his blog.


So long,
Paradox0n

P.S.: Welcome aboard Zzzzzz. The next wave of Majorca impressons is work in progress and will be posted soon :)

Sunday, November 10, 2013

Hobby Basics - Cleaning your stuff

Today I had a very frustrating moment (to be honest moments): Since the wheather here is REALLY bad I loaded my wet palette, got my miniatures I wanted to paint and switched some nice music on. Then I wanted to do the first brush strokes and BÄMM! One brush stuck together nearly to the point and the other brush divided itself into two nice halves... And worse to that, my airbrush completely stopped working and I had to disassemble it completely. And oh boy... it was nearly completely glued together (although I cleaned it after every usage like I described earlier). After calmly counting to 10 and taking some deep breathes I gritted my teeth and set to the task of cleaning my stuff. The brushes are my everyday brushes and its not really a loss if I can't rescue them but with the airbrush it is somehting completely different.

Lesson learned Number 1:  Keep your brushes in safety from your cats. Seems they found a new toy to play with on my desk and made things even worse...
Lesson learned Number 2: The Vallejo Primer I reviewed some time ago is a bit more sticky than normal paint and a normal blow out and cleaning isn't enough.

To see the positive in this disaster I thought on doing another Hobby Basic post on cleaning your stuff the advanced way :)

Saturday, October 12, 2013

Hobby Basics - Wet Palette Tutorial

As many of you, I also use a wet palette for mixing and keeping my colors fresh. Inspired by Mr. Lees post about his way of doing it, I thought about making a "wet palette my way" post too. Et voila here we are. First of all: This is no rocket science, and I think most of you already know or use a wet palette these days. If not: Do it! Even if you are a beginners painter you will feel the difference between using a wet palette or just fetching your colors from a paint pot.
But I think everyone does it a little different and its best to experiment a bit with the stuff you have until you are satisfied and it really works for you.

Wednesday, September 25, 2013

Quick tips from Kris Belleau

I just wanted to share some nice quick tips recently posted from Miniwargaming.com. To be precise the Quick tips"-series from Kris Belleau. I collected all those free videos into one playlist. There are even more in the Wargaming-Vault but since I don't have access to that I just wanted to share and point out those nice videos.


Hope you enjoy it.


So long,
Paradox0n

Saturday, May 4, 2013

Hobby tips - Cleaning your airbrush

My Airbrush, a Fengda FL-C 12209
As some tutorials in the web I read tried to tell me told how difficult the cleaning process of my airbrush should be and how it really isn't I thought a short article to sum up my experiences would be the best.

First of all: Cleaning your airbrush is neither complicated nor will it cost you much time. On the opposite! It should be part of your painting routine because it really makes the painting process much more comfortable.
If you ever opened your mouse to clean it.. Tadaaaa you can clean your airbrush too.

Saturday, April 13, 2013

Netfindings - NMM Gold Tutorial

Another lucky finding on the web: Rodion Rubin made a short but pictured tutorial of: How to paint NMM gold. Since I am a rather bad painter I always stand in awe in front of paint jobs like these.
Last picture of the NMM painting tutorial from Rodion Rubin
Last picture of the tutorial
Hope this is useful for you.

Cya,
Paradox0n

P.S.: If you aren't interested in news/stuff like this, please say so ;)

Saturday, December 1, 2012

HowTo: A simple industrial base

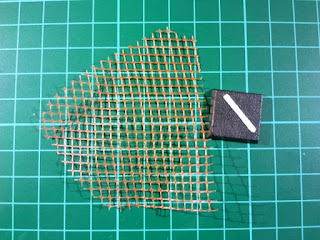
While sitting around and experimenting with stuff, I got the idea to make a simple industrial base for games like Necromunda, Eden etc. As usual I tried to do this with stuff lying around and had in mind to do a tutorial if the result is somewhat OK.
As you read this, I must have thought it worthy to write about :)

Putting some mesh on your base

Using plastic net as mesh
Some plastic net and a base
To be honest, this was the most tricky part of this experiment. At first I tried to cover the base in superglue and then just press the plastic net onto it. But since I have the "gel type" of superglue I think this didn't work out. Therefore I just used superthinned wooden glue to pin the net down and waited for it to dry completely

Tuesday, October 9, 2012

Wheathering tutorials from Mike Chambers

Some time ago I stumpled upon some really great tutorials on how to stain/wheather wood. Just have a look at Rusty Stumps Scale Models, especially the ones from Mike Chambers are really good.

He uses multiple inks to stain real wood and use it for terrain and buildings. Especially the small series about this technique is really good. If you want to risk a look, here are the direct links to the PDFs from the page:
If you like them, just take a look at the other articles on they page, they have some really nice tips there.


So long,
Paradox0n


P.S.: A small comment if I should be continue with stuff like this would be appreciated. Don't want to bore you to death with stuff you all already know :)

Tuesday, September 18, 2012

Weathering techniques - Videos from Mac McCalla

I found some nice videos for wheathering techniques by Mac McCalla and collected them into a playlist. Some very useful tips there, hope you enjoy them as much as I did:


So long,
Paradox0n

Saturday, August 11, 2012

HowTo: Building a tower - Part 4

The roof, the roof, the roof is on fire. I thought a while about the roof I want to build for my tower: Just a flat one with battlements or a pointy one with roofy shingles? Since I already invested so much time I decided to make the pointy one. So start the video and read the rest of this article :)


Sunday, July 15, 2012

HowTo: Building a tower - Part 3

After building and painting the core for my tower, it is time to build the upper level of it. Somewhere the guards or other inhabitants must live.

First I built a core of styrofoam which diamater was a little bigger than the stone structure. Then I glued everything on the top of my stoneworks and let everything really dry. Meanwhile I sorted and cut my wooden "swizzle sticks" into the same length. You need more than you think, I had to borough some of my friend. Lucky enough you get them for free in every fast food restaurant. I used some clippers. The edges don't need to be plain and exact.

Cutting everything to length

Monday, July 9, 2012

HowTo: Modular Gaming Table - Part 4

Ok, we already went through a lot of steps. First we prepared the six basic modules and shaped some with hills and then we started coating everything with our structure paint. Now it's time to adding detail to the whole thing. This part is again not really magical, but you should take care in this process. The most importan thing is that every module must be completely (!!!) dry. We had a kind of "oven" on my balcony on which the modules could dry for a complete summer day.

Dried modules
Drying station for our modules

Thursday, June 28, 2012

HowTo: Modular Gaming Table - Part 3

It's terrain thursday (nah just kidding, atm I am in the mood to do so) so I will post another part of my modular gaming table series. After preparing the six basic modules and shaping some with hills it is time to get dirty and put some paint onto our modules. Therefore we mix our own structure paint (the paste/paints you can buy are WAY too expensive). Besides a big bucket (~5l bucket is big enough) we need:

Bucket of PVA/white glue:

Approx. cost:  ~ 8 Euro

Bag of bird grit:

Approx. cost: ~ 90ct

Bottle of brown paint:

Approx. cost: ~ 5 Euro

Pour everything together, in the end we used a mixing ratio of about 1:1:1:1 (water, paint, sand, glue). Just try it out what suits you best. The structure paint should not be too runny and should not be as thick as toothpaste. You should be able to spread it out easily without the paint beeing transparent or only gluing sand...

Applying the structure paint 

Related Posts